> ## Documentation Index
> Fetch the complete documentation index at: https://armorsmith-designer.mintlify.site/llms.txt
> Use this file to discover all available pages before exploring further.
# Creating Your 3D Avatar in Armorsmith Designer
> Set up a 3D avatar that matches your real body measurements so every costume part you attach scales and fits correctly from the start.
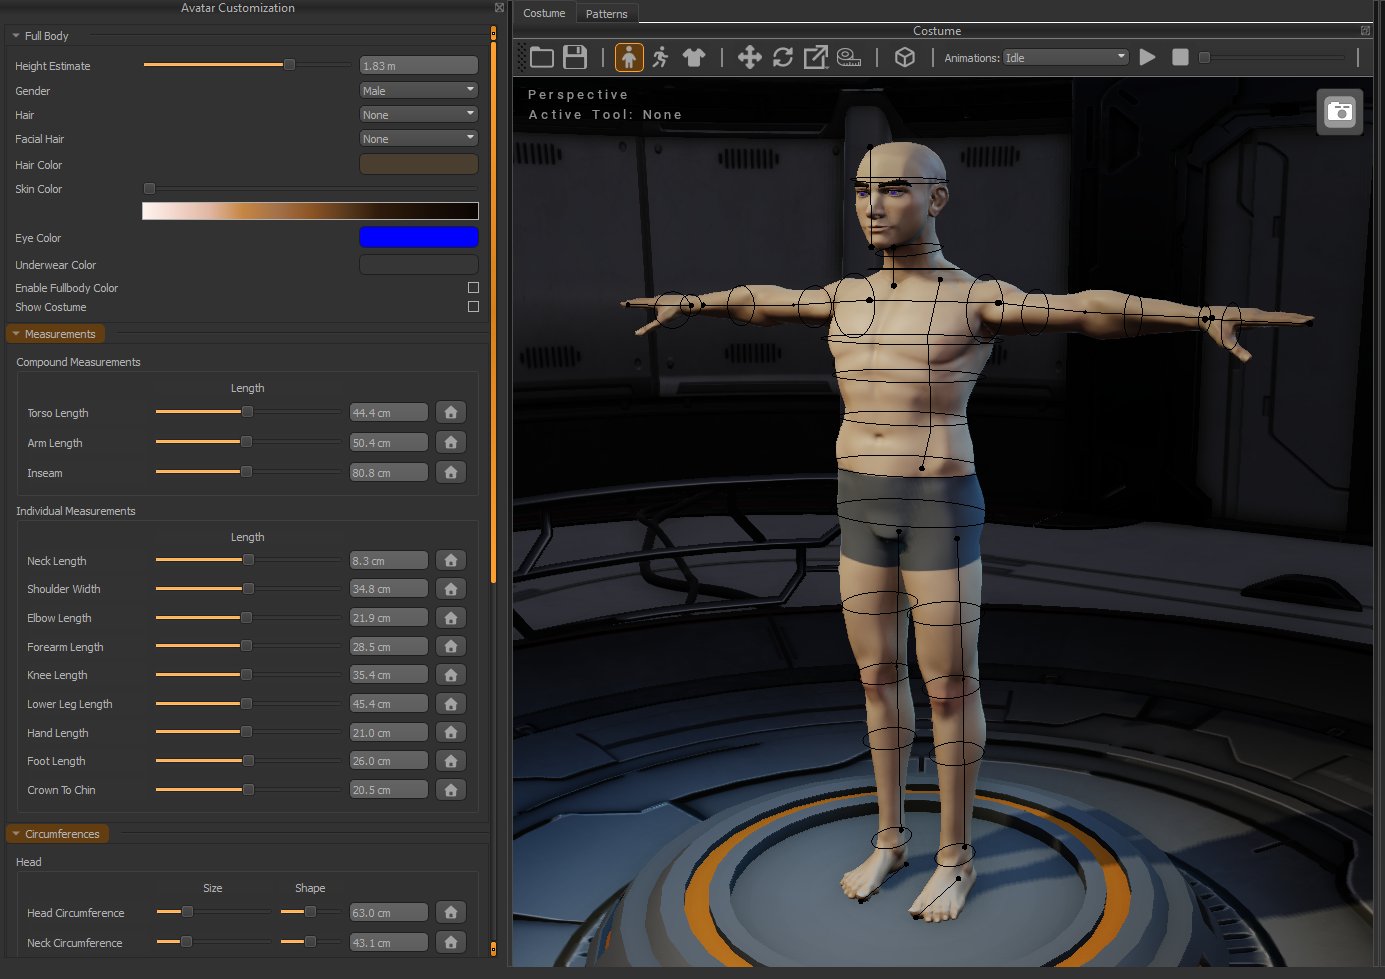
The **Avatar Customization** panel allows you to customize the appearance and measurements of your avatar. Use this panel to create an avatar that closely matches your own body measurements before fitting costume pieces.
Changes made in the Avatar Customization panel are immediately reflected on the avatar in the Work Area.
 ## Full Body
The **Full Body** section contains the general settings for your avatar, including height, gender, appearance, and display options.
Sets the approximate overall height of the avatar.
Adjusting the height estimate scales the avatar while maintaining its current body proportions.
Set your **Height Estimate** before adjusting individual measurements. This provides a good starting point for customizing the rest of the avatar.
Selects the base body type used by the avatar.
Changing the gender will update the underlying avatar proportions and available appearance options.
Changing the gender will reset your measurements back to the baseline.
Selects the hairstyle displayed on the avatar.
Selects the facial hair displayed on the avatar.
Sets the color of the avatar's hair and facial hair.
Adjusts the skin tone of the avatar.
Sets the eye color of the avatar.
Sets the color of the avatar's underwear.
Overrides the avatar's individual colors with a single full-body color.
Controls whether currently loaded costume pieces are displayed while editing the avatar.
Disable this option when you want an unobstructed view of the avatar and its measurements.
## Measurements
The **Measurements** section allows you to fine-tune the dimensions and proportions of the avatar.
Measurement guides are displayed directly on the avatar in the Work Area, making it easier to see which part of the body is affected by each adjustment. When you mouse over a measurement it will display that measurement in orange. Make note of where the beginning and end of the line are as that is where you should measure for these values.
Measurements are divided into **Compound Measurements** and **Individual Measurements**.
### Compound Measurements
Compound measurements represent larger body dimensions that depend on several parts of the avatar.
Adjusts the overall length of the torso.
Adjusts the total length of the arm while maintaining the relationship between the upper arm and forearm. This means that if you edit this measurement it will also change the upper arm and forearm measurements
Adjusts the total inside leg length while maintaining the relationship between the knee length and lower leg length. This means that if you edit this measurement it will also change the knee length and lower leg measurements
Compound measurements are useful when you have a real-world body measurement but do not know the dimensions of each individual body segment.
### Individual Measurements
Individual measurements provide more precise control over specific parts of the avatar.
These include measurements such as:
* Neck Length
* Shoulder Width
* Elbow Length
* Forearm Length
* Knee Length
* Lower Leg Length
* Hand Length
* Foot Length
* Crown to Chin
Adjusting an individual measurement modifies that specific portion of the avatar.
### Reset Measurement
The **Reset** button beside a measurement restores that measurement to its default value.
This can be useful if you want to undo an individual proportion change without resetting the entire avatar.
## Circumferences
The **Circumferences** section controls measurements around the body, such as the head, neck, chest, waist, arms, and legs.
Each circumference may provide two controls:
**Size** changes the overall circumference of that part of the body.
**Shape** changes how the circumference is distributed without significantly changing its overall size.
For example, two people may have the same chest circumference while having different chest shapes. The **Shape** control allows the avatar to better represent these differences.
* Head
* Neck
* Neck Base
* Chest
* Underbust
* Waist
* High Hip
* Thigh
* Knee
* Calf
* Ankle
* Shoulder
* Bicep
* Forearm
* Wrist
For the most accurate results, enter your real-world measurements where possible instead of relying only on the visual appearance of the avatar.
## Measurement Guides
When editing the avatar, measurement guides are displayed over the model in the Work Area.
These guides show where each measurement is being taken and provide a visual reference for how the avatar's dimensions relate to the values in the Avatar Customization panel.
The guides automatically update as the avatar's proportions are changed.
Enter your measurements as precisely as possible. A single bad value — for example, a height entered in inches when the field expects centimetres — can cause severe distortion.
Once your avatar looks right, you are ready to attach costume model files and start generating templates. You can return to **Edit Avatar** at any time to update your measurements — for example, after losing or gaining weight, or when building a costume for someone else.
## Full Body
The **Full Body** section contains the general settings for your avatar, including height, gender, appearance, and display options.
Sets the approximate overall height of the avatar.
Adjusting the height estimate scales the avatar while maintaining its current body proportions.
Set your **Height Estimate** before adjusting individual measurements. This provides a good starting point for customizing the rest of the avatar.
Selects the base body type used by the avatar.
Changing the gender will update the underlying avatar proportions and available appearance options.
Changing the gender will reset your measurements back to the baseline.
Selects the hairstyle displayed on the avatar.
Selects the facial hair displayed on the avatar.
Sets the color of the avatar's hair and facial hair.
Adjusts the skin tone of the avatar.
Sets the eye color of the avatar.
Sets the color of the avatar's underwear.
Overrides the avatar's individual colors with a single full-body color.
Controls whether currently loaded costume pieces are displayed while editing the avatar.
Disable this option when you want an unobstructed view of the avatar and its measurements.
## Measurements
The **Measurements** section allows you to fine-tune the dimensions and proportions of the avatar.
Measurement guides are displayed directly on the avatar in the Work Area, making it easier to see which part of the body is affected by each adjustment. When you mouse over a measurement it will display that measurement in orange. Make note of where the beginning and end of the line are as that is where you should measure for these values.
Measurements are divided into **Compound Measurements** and **Individual Measurements**.
### Compound Measurements
Compound measurements represent larger body dimensions that depend on several parts of the avatar.
Adjusts the overall length of the torso.
Adjusts the total length of the arm while maintaining the relationship between the upper arm and forearm. This means that if you edit this measurement it will also change the upper arm and forearm measurements
Adjusts the total inside leg length while maintaining the relationship between the knee length and lower leg length. This means that if you edit this measurement it will also change the knee length and lower leg measurements
Compound measurements are useful when you have a real-world body measurement but do not know the dimensions of each individual body segment.
### Individual Measurements
Individual measurements provide more precise control over specific parts of the avatar.
These include measurements such as:
* Neck Length
* Shoulder Width
* Elbow Length
* Forearm Length
* Knee Length
* Lower Leg Length
* Hand Length
* Foot Length
* Crown to Chin
Adjusting an individual measurement modifies that specific portion of the avatar.
### Reset Measurement
The **Reset** button beside a measurement restores that measurement to its default value.
This can be useful if you want to undo an individual proportion change without resetting the entire avatar.
## Circumferences
The **Circumferences** section controls measurements around the body, such as the head, neck, chest, waist, arms, and legs.
Each circumference may provide two controls:
**Size** changes the overall circumference of that part of the body.
**Shape** changes how the circumference is distributed without significantly changing its overall size.
For example, two people may have the same chest circumference while having different chest shapes. The **Shape** control allows the avatar to better represent these differences.
* Head
* Neck
* Neck Base
* Chest
* Underbust
* Waist
* High Hip
* Thigh
* Knee
* Calf
* Ankle
* Shoulder
* Bicep
* Forearm
* Wrist
For the most accurate results, enter your real-world measurements where possible instead of relying only on the visual appearance of the avatar.
## Measurement Guides
When editing the avatar, measurement guides are displayed over the model in the Work Area.
These guides show where each measurement is being taken and provide a visual reference for how the avatar's dimensions relate to the values in the Avatar Customization panel.
The guides automatically update as the avatar's proportions are changed.
Enter your measurements as precisely as possible. A single bad value — for example, a height entered in inches when the field expects centimetres — can cause severe distortion.
Once your avatar looks right, you are ready to attach costume model files and start generating templates. You can return to **Edit Avatar** at any time to update your measurements — for example, after losing or gaining weight, or when building a costume for someone else.